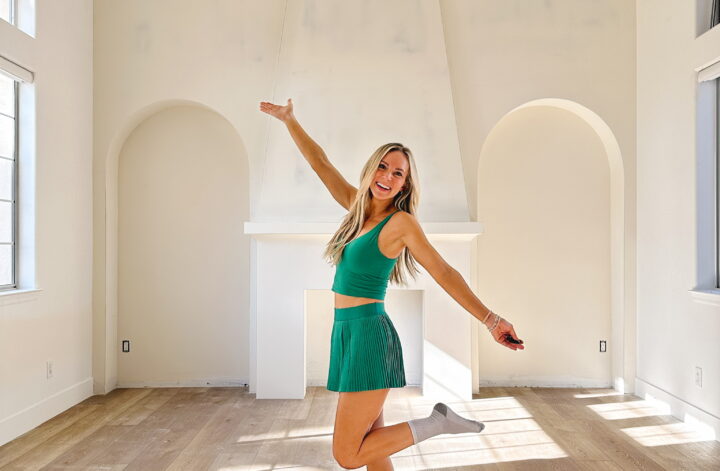
I’ve been dreaming of a gorgeous built-in fireplace for my home for many years, and I finally started the makeover! It took a bit of work, but I am absolutely in love with the results so far. If you’ve been wishing for a front room fireplace makeover with gorgeous arches in your home, here’s your sign to do it!
The gold light fixtures over the arches, the distinct angles on the mantle, and the huge ceiling light brought the whole makeover together. So far, I am loving the vibe in this room! The high ceiling is really what makes this room have such an awe fac
tor, and now that the fireplace and arches are in place it highlights the space perfectly!
There’s a lot that went into this first phase of my front room update, so keep reading to learn what I did to design the fireplace makeover of my dreams!
Before:

After:

Fireplace Makeover
When I first bought my house I knew the front room had so much potential. Once I replaced the floors and modernized the windows, I knew this would be the perfect room for a gorgeous fireplace design!
The fireplace makeover was quite the process, but it was completely worth it. Here’s the step-by-step process I took to get this project going.
1. Taping Out the Design
Taping out the design is one of my first go-to processes to help me visualize my makeover ideas. I got the inspiration for this fireplace makeover from Jenna Sue Design and the arches from Studio McGee.

Once I had a vision of what I wanted the fireplace and arches to look like, I grabbed my painters tape and laid out the design on the wall. This is always a great first step because it helps me nail down my measurements and helps me see what the design will actually look like once it’s completed.
While taping the design, I wondered if I needed to make a slight adjustment before framing. Once everything was taped off, I almost made the fireplace a smidge wider and the arches a bit smaller, but I decided to keep it as is!
2. Framing and Drywall
While I could have figured out a way to create the fireplace and arches on my own, I decided to hire help for the framing and drywall for this project. I got a lot of questions about why I wasn’t doing this part of the project on my own, and it really came down to listening to my gut!
I’m sure I could have worked out a way to do this part of the project by myself, but I’ve been trying to hire out for some projects that are more difficult for me to complete on my own. A big reason why I didn’t do this all myself is because the ceiling in this room is super high (almost 16 feet in some areas!), and I knew I couldn’t physically hang 4×8 sheets of drywall on scaffolding by myself!

So while I didn’t do the framing by myself, I watched the workers the whole time and asked them dozens of questions for me to refer back to in the future. I don’t think they minded too much. I was so fascinated by the whole process!
The other reason I hired help is that even though I CAN do everything by myself, I don’t have to! This project would have taken me weeks or maybe even months to complete on my own. Instead, it took a few guys just 3 days! It was so exciting watching them frame everything and seeing my vision slowly come together. I am also super proud that my measurements and design all worked!
3. Electrical, Mudding, and Plaster
I also hired professionals for the electrical, mudding, and plaster portions of the project. I’m glad I did because it would have been a ton to do on my own and I learned so much from watching the different workers create the foundation for me. However, if you’re thinking you want something like this done in your home and you want to try it out yourself, I say go for it!
My daughter and I were the best audience for the man mudding the fireplace. It was soooo satisfying to watch! (You can catch a glimpse of the mudding on my Instagram page in my Front Room highlight bubble!) I of course had a million questions and thankfully he didn’t seem bothered by it!
The original walls have a bumpy texture, so I had to decide if I wanted the same texture on the arches and fireplace or to keep it smooth. I am not a huge fan of the bumps, so I went with smooth. I ended up loving it! This goes to show that you can choose what you love most, even if it strays a little bit from what was originally there.
View this post on Instagram
4. Building Floating Shelves
Once the framing, electrical, mudding, and plaster were done, I was ready to build floating shelves. Before placing the floating shelves, I taped off where the shelves would go to help me visualize everything (taping out your design is seriously a game-changer!). I ended up planning on building four shelves, each one around 15 inches apart. There is a bigger gap from the floor to the first shelf (22 in.) that I wasn’t sure about at first, but it ended up being perfect!
I hadn’t built floating shelves in five years, so I had to refigure it out. I used a Kreg jig (to drill angle pocket holes) to attach the middle supports. Once the support was all screwed in, it was time to hang the plywood.
I placed ½ inch birch plywood on top and ¼ inch birch plywood on the bottom. It’s like making a sandwich! The poplar front piece goes on last, and I decided to measure it so it has a slight overhang on each end of the shelf. I LOVE this added detail!
Pro Tip: Predrill the holes in the wall before holding up the wood slab to make hanging the wood easier.

5. Finishing Touches
All that I have left on this fireplace makeover is to decide on the color and add all those fun finishing touches! To begin wrapping this up, I added gold lights to hover over the shelves. It adds an extra touch that just levels up the entire space! I’m also really loving the giant chandelier and green chairs. It’s a whole vibe, and I am here for it.
This front room is coming along so beautifully, and this fireplace makeover turned out even better than I originally imagined! This front room is well on its way to being a cozy place to hang with my family.

Front Room Fireplace Makeover
It was so much fun seeing my front room evolve into this new space with a statement fireplace and arches. Don’t worry, I will make sure to keep you updated once the whole front room makeover is complete!
I can’t wait for you to enjoy all the projects you complete in your home! Here are some other blog posts that will help you on your DIY journey:
- Cozy Modern Living Room You Can DIY
- My Last Fireplace Room with Links to Shop
- Best Rugs for Your Living and Dining Room
- Unique Light Fixtures to Fit Any DIY Refresh
- Top 3 Favorite DIY Shelves
Follow me on Instagram and TikTok so that you can see all my latest DIY projects and building tips. Whether you’re a beginner or a more advanced DIY-er, I’d love for you to follow along!
Disclosure: I only recommend products I would use myself and all opinions expressed here are my own. This post may contain affiliate links that at no additional cost to you, I may earn a small commission. Read the full privacy policy here.


